Table of Contents
Glowing Ball of Light
Summary
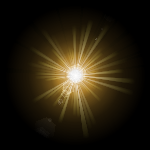
In this tutorial, we're going to create a glowing ball of light, that looks something like this:

Naive Attempt
Let's go ahead and use this image in a scene with alpha blending:
[GlowingBall]
Graphic = @
Texture = enobayram_glow_normal.png
Pivot = center
Position = (0,0,0)

Awesome! A shining star, piercing through the clouds warming our hearts! Let's move it around a bit and see what happens; I'm going to move it over to the bright clouds on the right.
Position = (150,50,0)

What!?! Our beacon of love and warmth is actually making a bright background darker! Well, that's because our glowing ball is not actually a light source, it's simply the picture of a light source, printed on transparent paper. No matter what we use as the texture, it'll always make a brighter background darker.
Using Additive Blending
So, we need to change the blending mode, let's try additive blending, which means that our object's pixel values will be added to its background instead of being averaged:
[GlowingBall]
Graphic = @
Texture = enobayram_glow_normal.png
Pivot = center
Position = (150,50,0)
BlendMode = add

Now the trouble is that the bright region was already close to full white and adding our glow has saturated it, so we can't even see any trace of yellow, the color yellow is only visible over the neighboring region where the background wasn't that bright. We could try to reduce the brightness of our texture, but then the light appears too weak over the dark regions. See:
[GlowingBallBase]
Graphic = @
Texture = enobayram_glow_normal.png
Pivot = center
BlendMode = add
Color = (100,100,100)

[GlowingBall@GlowingBallBase]
Position = (-150,-100,0)

[GlowingBall2@GlowingBallBase]
Position = (150,50,0)

When the texture is dark enough that we're barely avoiding too much saturation, it's already too dark over a black cloud.
Using Awesome Blending!
So, what we want is a kind of blending that doesn't saturate a bright region, doesn't make it darker under any condition and yet it's still strong enough over a dark region. Let's see how the two blending modes we've used so far work:
Alpha Blending:
Output Color = Object Alpha * Object Color + (1 - Object Alpha) * Background Color
Additive Blending:
Output Color = Object Alpha * Object Color + Background Color
In addition to these, there's also multiplicative blending, which works like this:
Multiplicative Blending:
Output Color = Object Color * Background Color
Which is clearly not what we want, since this will always make the background darker. Let's imagine for a moment, what kind of blending would work for us; We would like to increment the bright regions a bit(so we need something additive), but never saturate them. So, maybe, we could scale our additive texture with the remainder of the background color from pure white. That's how such blending would look:
Awesome Blending:
Output Color = Background Color + (Pure White - Background Color) * Object Color
Unfortunately, such a blending mode doesn't exist :(
We could render our scene to a texture, blend our glowing ball on top of that texture, and render that resulting texture inside a real viewport. One problem with this is the added complexity just for a heart-warming ball of pure love! Another problem is that we might want to have other objects in front of our glowing ball, and that further complicates our setup.
What we could do instead, is to simulate “Awesome Blending” using a superposition of two objects! Let's rearrange our “Awesome Blending” equation as follows:
Output Color = Background Color * (Pure White - Object Color) + Pure White * Object Color
Please take a moment to verify that this is exactly the same equation, just rearranged. See, now we have a term, that's a multiple of the “Background Color” and a second term that's additive and independent of the “Background Color”. We can imitate this blending by superposing two objects with different textures, one using multiplicative blending, and the other additive.
The texture for the additive term is simply our glowing ball texture, rendered on top of a black background:
And the texture for the multiplicative is simply the inverse of the additive texture:

Now we modify our GlowingBall object to contain these two textures with respective blending modes:
[GlowingBallBase]
ChildList = GlowingBallAdditive # GlowingBallMultiplicative

[GlowingBallAdditive]
Graphic = @
Texture = enobayram_glow_additive.png
Pivot = center
BlendMode = add
Position = (0,0,-0.0001); So that additive is applied later

[GlowingBallMultiplicative]
Graphic = @
Texture = enobayram_glow_multiplicative.png
Pivot = center
BlendMode = multiply

[GlowingBall@GlowingBallBase]
Position = (-150,-100,0)

[GlowingBall2@GlowingBallBase]
Position = (150,50,0)
And here's the result:

Very powerful over the dark clouds, but no saturation over the bright ones :)
And here's the source code and the textures of the final state.
BONUS: Creating The Negative Image On-The-Fly With A Shader
In the previous section, we've used a separate image file as the texture for multiplicative component, while it's simply the negative of the additive component. We can gain much flexibility, and simplify our workflow by simply calculating the negative image on-the-fly with a custom fragment shader. Using a custom shader is spectacularly easy with Orx! We simply replace our [GlowingBallMultiplicative] section with the following:
[GlowingBallMultiplicative]
Graphic = @
Texture = enobayram_glow_additive.png
Pivot = center
BlendMode = multiply
ShaderList = NegativeShader

[NegativeShader]
ParamList = texture
Code = "// Shader code
  void main()
  {
   vec4 tex = texture2D(texture, gl_TexCoord[0].xy);
   gl_FragColor.a = 1.0;
   gl_FragColor.rgb = 1.0 - tex.rgb;
  }"
This way, we don't need to maintain a negative image anymore, and our game's disk footprint has shrunk.
